How to Configure Database Mail in SQL Server
Database Mail
is one of the interesting features of MS SQL Server. Database mail is not
configured to be “on” by default. You must enable Database mail before you can
configure and use the capabilities it provides. There are three different ways
you can enable database mail in SQL Server, which are as follows:
The Database Mail
Configuration Wizard
This is a
graphical wizard, it can be launched from SSMS that will enable database mail
and configure the basic capabilities of the service. This is what we will use
in this article.
sp_configure
Apart from SSMS
you can also configure database mail via store procedure that is the sp_configure system to enable or disable database
mail. You specify the option „Database Mail XPs‟ (an advanced option in sp_configure) to 1 to enable database mail, or 0 to disable
database mail.
Policy Based
Management
In SQL Server explorer under
management node you can see “Policy Based Management”. You can specify the
Facet “@DatabaseMailEnabled” and set the
value to True, then add this facet configuration to a policy, and then apply
that policy to the specific SQL Server you want to work with. This feature is
available to 2008 and later versions.
How to Enable Database
Mail SSMS
To get started with database mail, connect to
SQL Server Management Studio (SSMS), and then expand the Management folder, and
right-click on the Database Mail entry. Select the option to “Configure
Database Mail”, and the database mail configuration wizard will
launch, displaying an introduction to the wizard. Click next, and you will see
the options available in the wizard, as below.
As we know this is the first time the database mail
configuration wizard has been run, so you will need to keep the option to set
up Database Mail.

Now Click Next,
and a new window will appear as below:

You will then be presented the New Profile dialog. Enter a
profile name and description, as below:

And then click on the Add
button a new window will appear as below. Now we have to fill the account
name and description as below:

The server name field may be either the DNS name or the IP
address of the SMTP mail server you wish to use for this specific mail account. Here
we are using Gmail account so we will have to give Gmail server name that is “smtp.gmail.com”.
The default port number is 25. The port
which we are using for Gmail is “587”. Then fill up the authentication using
your Gmail id and password.
Ø You can also use Windows Authentication which will come to the
SMTP server as the service account used by the SQL Server Database Engine
service (mssqlservr.exe).
Ø Anonymous authentication means no authentication.
Now Click Ok
button and a new window will come up as below:

You can create additional accounts in the wizard here to
be associated with the mail profile i.e.
Admin_vimal. If the first account fails to connect to the mail server
and send email for some reason, the second account in the list will be used. You
can have multiple accounts associated with a single mail profile. But for now
we will only use a single SMTP account. Click on Next Button.
A new window will come with the option to make the mail
profile you have created a “public” profile. Public” profile means allow all
authorized database mail users to send email using this mail profile. Another
option is private. In Private you would have to
associate the profile with a user id from the msdb database that is system
database. Since this is the first profile, make it the default public
profile

Now we are finished with configuring our initial database
profile. Now click Next Button. Now you will be presented with the “Configure
System Parameters” dialog, which allows you to change system-wide
settings for database mail.
The fields are easy to understand.
The one which may not clear to us is logging level. There are three possible
logging levels – Normal, extended, or verbose.
Normal: It
logs only errors.
Extended:
It logs errors, warnings and Informational Messages
Verbose: If you are in position to troubleshooting a problem or want to see as
much information about database mail as possible, set the logging to verbose.
You can then review the database mail logs in SSMS (or thesysmail_event_log
view in the msdb database)
Default logging
level is extended. For this article, accept the defaults, click Next, and then
Finish to create the mail profile and account specified on the profile page.

Click to Finish
button.

We have successfully configured the
database mail. Now what???? The Next Steps, Once
the wizard is complete; there are a few steps to confirm that the database mail
is properly configured. First, we will send a test email. Then, we will review
the logs to see the basic information about that test email that was recorded
by database mail.
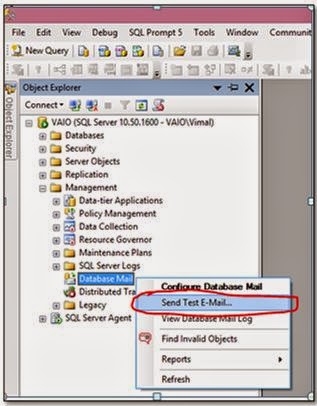
on
“Send Test E-mail..” after that fill up the window as below:

Now click to “Send Test E-mail”

Review
the Database Mail log:
Connect to msdb database and run the below
statements to view the logs.
SELECT * FROM sysmail_log
SELECT * FROM dbo.sysmail_profile
SELECT * FROM dbo.sysmail_sentitems
SELECT * FROM dbo.sysmail_send_retries
SELECT * FROM dbo.sysmail_mailitems etc....
Or you can also see it via SSMS by clicking “view database mail log” as
below.

Thanks
for reading this article!!!
No comments:
Post a Comment